PROOM
FAQ
Which topic of PROOM are you interested in?


In general
PROOM recommnds an SDSL connection. Otherwise, performance limitations may occur as the upload and download performance depends heavily on the user’s DSL speeds.
PROOM On-Premise
The following minimum system requirements must be met (further systems upon request):
- Operating system: Windows Server 2012 R2 English
- Database management system: SQL Server 2012 R2 x64 English. A valid SQL license for the appropriate SQL Server edition must be available.
- Internet Information Server (IIS); is already included in (1) and must be installed
- Minimum requirements: 2.2 GHz / 4 GB RAM / 4 cores / 500 GB disk space.
- Microsoft Silverlight
You can upload or download any size files – there is no limit.
Windows Azure is hosted in the data centers of Microsoft in Europe. The data centers are
certified according to ISO/IEC 27001:2005, SAS 70 Type II, FISMA, and PCI.
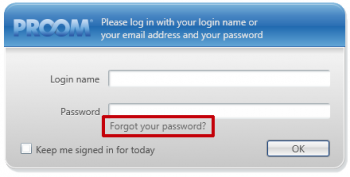
- If you have forgotten your password, click on “Forgot your password?” on the login screen.
- An input field is displayed.
- Enter your login name or your e-mail address.
- A one-time password is sent to your e-mail address.
- When you log in with this one-time password, you are automatically prompted to specify a new password.
IE8

Firefox

Google Chrome
![]()
Select “Save” to download the file. If you do not want to receive this message again, you can disable the phishing and malware protection as follows (#Link#not recommended):
- Click the wrench icon in the browser toolbar.
- Select “Settings”.
- Click on “Show advanced settings” and go to the “Privacy” section.
- Disable the “Enable phishing and malware protection” checkbox.
If Silverlight cannot be loaded properly, the following message is displayed in the browser:

You can download the latest version at https://www.microsoft.com/silverlight. Before the installation of the latest version, it is recommended to uninstall any previous version via the usual OS functions.
2. Browser change
If the latest version of Silverlight is installed and you cannot log in to PROOM, please try a different browser:
Silverlight System Requirements – Compatible Operating Systems and Browsers
Alternatively, you can update your browser, uninstall Silverlight and reinstall Silverlight again. Furthermore, you should set the security and plug-in settings of your browser to “Default”. A web research for ‘<browser name> Silverlight plugin problem‘ may return useful hints.
PROOM basiert auf Silverlight. Wenn Sie noch kein Silverlight installiert haben, erhalten Sie automatisch folgenden Hinweis:
Click ‘INSTALL’.
In Ihrem Downloadordner befindet sich jetzt eine dmg-Datei (=DiskImage). Klicken Sie doppelt auf diese Datei, um zur eigentlichen Packagedatei ‚Silverlight.pkg‘ zu gelangen. Über ein Doppelklick der Packagedatei starten Sie die Installation von Silverlight. Führen Sie die einzelnen Installationsschritte durch.
“OS X includes a host of features designed to protect your Mac and the information on it. Gatekeeper makes it safe to download and install apps. FileVault safeguards data using powerful encryption. Sandboxing protects your system by isolating apps from each other, as well as from your system and your data.”*
Information on resolving the problem can be found here.
*Web site Apple, http://www.apple.com/osx/what-is/security/, 05/15/2014
You will still be able to access the portal through Internet Explorer and older versions of Chrome. Alternatively, you can also use the PROOM Desktop App https://support.procad.de/proomdesktop/ to conveniently access PROOM straight from your desktop without having to go through the browser.
The upcoming version of PROOM will also support the new Google Chrome browser.
Microsoft Silverlight – compatible operating systems and browsers:
http://www.microsoft.com/getsilverlight/get-started/install/default.aspx?reason=unsupportedbrowser
Working with PROOM
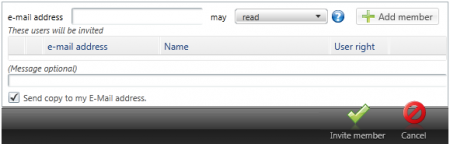
- Click on “Invite user” in the toolbar.
- Enter the e-mail address of the new member you want to invite.
- Assign user permissions.
- Optionally, you can add a message to the automatic e-mail.
- Click on “Invite user”.
In the “Users” sidebar, the project room manager can adjust the permissions of the indiviudal members at any time.
Delete user
If a user who has been deleted from the project room is to be granted access the project room at a later point in time, the user has to be created again.
Lock user
If a user has been locked, he or she can no longer access the project room, but is still listed in the user list. If the user is to be granted access to the project room at a later point in time, the user has to be unlocked.

Select the project room in the project room overview, select the user from the sidebar, and click on the “Lock” icon.
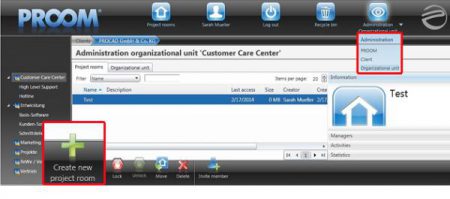
1. You have the necessary rights to create and delete project rooms yourself.
Creating project rooms
– Switch to the project room view.
– In the toolbar, click “Create new project room”
– In case of multiple organizational units, select the organizational unit to which
you want the assign the project room from the sidebar on the left.
– Select “Create project room”.
Deleting project rooms
– Switch to the project room view.
– Select the project room you wish to delete.
– In the toolbar, click “Delete”.
– The project room and the files stored in it will be completely and permanently deleted.
Please note: You can only delete project rooms that you have created.

2. Contact the manager of your organizational unit to be granted access to additional project rooms or to delete individual project rooms.

If you have created a new folder you can choose whether the folder inherits the permission of the parent folder or project room. This option is activated by default. If you deactivate this option, the folder is only visible for you and the project room manager. If this option is activated at a later time via the “Information” sidebar, all permissions to this folder are removed.

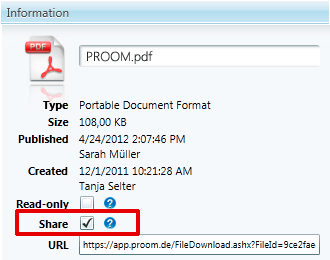
You can specify information for each folder and file via the “Information” sidebar and by clicking on the “pen”.
The permission “view” means that the project room member can only view files in PDF format. He or she can store files locally, but is not authorized to edit or print them.
You want to make a call for proposals via you project room and collect offers from several companies. The companies are not to see the other companies involved in this process.
Proceeding:
- You create a project room, in which the permissions are not inherited. For this, you need to uncheck the box “Inherits permissions” in the sidebar under “Information”.
- The list of users and the activity log are, by default, visible to all project room members in the sidebar. As you do not want the involved companies (or their representatives) to see this information, this information has to be hidden explicitly. To do so, activate the checkbox “Hide users”.

Note: The list of users and the activity log are still visible to the manager of a project room after activation of the checkbox.
3. In the next step, create a folder for your tender documents and a separate folder for each company participating in the bidding.

Attention: Do not activate the checkbox “Inherits permissions” when creating a new folder.

4. Invite the companies (or their representatives) into your project room. Specify – for each folder individually – which of the invited users may see the folder and what the user is allowed to do with the information therein.
The tile view also shows whether a new version has already been created for a file.

IE8

Firefox
Google Chrome
![]()
Select “Save” to download the file. If you do not want to receive this message again, you can disable the phishing and malware protection as follows (#Link#not recommended):
- Click the wrench icon in the browser toolbar.
- Select “Settings”.
- Click on “Show advanced settings” and go to the “Privacy” section.
- Disable the “Enable phishing and malware protection” checkbox.
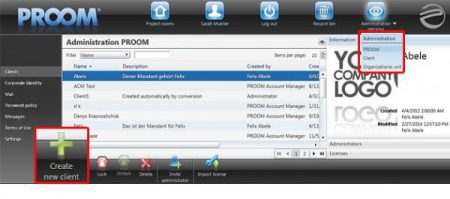
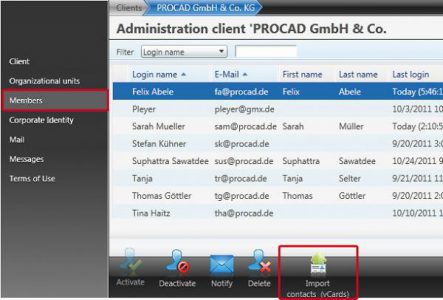
Administration

The client administrator can, among other things, create organizational units, e.g. departments, to provide a better overview, manage client users, and determine the PROOM design, e-mail templates, and the notifications after a user logs in.
If you are using PROOM as a Service, we will provide the client to you.
If you are using the on-premise version of PROOM, we will provide you with a license file that you can import under administration PROOM – Client – Create new client.
subunits.
The subdivision into organizational units and assignment of responsible individuals allow you to distribute the administration of the project rooms among multiple employees. There is no need for
central administration.
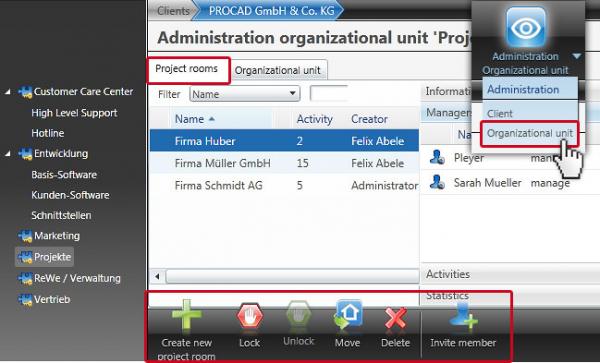
- Users may “manage”: Create project rooms and manage the organizational unit
- Users may “Create project rooms”: Project room creation and no authorization to manage the organizational unit
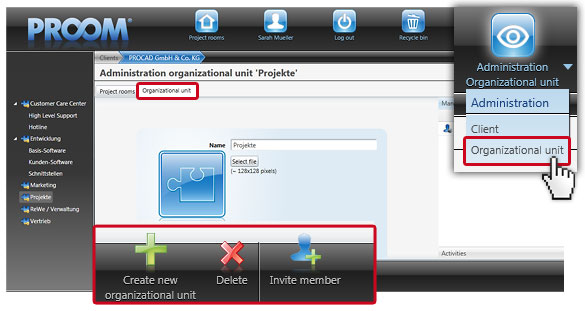
Under Administration “Organizational unit” and “Invite users”, the manager of an organizational unit can designate additional users as managers of his or her organizational unit.
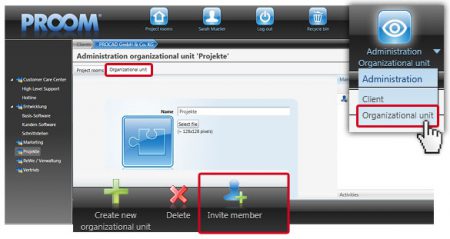
The manager of an organizational unit is responsible for the further structuring of his or her organizational unit.
Please note: If you designate yourself as the manager of an organizational unit, you can further structure the unit under Administration “Organizational unit”.
These client-specific notifications are then displayed for all PROOM users upon login.
The license will be imported for you.
If you are using the on-premise version of PROOM, please import the license as described below:
1. Go to PROOM administration – Client
a) Select the client.
b) Click “Import license”

2. Client administration – Licenses
Here, you can import licenses, view the license scope and license utilization, request proposals, and ask contract-related questions.

PROOM App
For the PROOM app for iOS, “Insecure certificates” is already activated and does not need to be set manually.
You can access the menus for the new commands by tapping and holding on your Android device and by swiping left and clicking “more” on your iOS device. You can also access these menus through the details for the relevant objects.
files
- “Make available offline”: This will start the download and mark the file for offline use. If the file has already been cached, this file will be used.
- “Delete offline copy”: After confirmation by the user, the local copy of the file will be deleted.
- “Update offline copy”: If a file is available offline and a new version of the file is uploaded to the PROOM server, the new version will be downloaded.
Project rooms/files
- “Offline (excl. subfolders)”: All files in this folder will be made available offline. This will only download files that are not yet available locally.
- “Offline (incl. subfolders)”: All files in this folder including all subfolders will be made available offline.
- “Update offline copies”: All files in the selected folder (including its structure) that are available offline will be updated with their latest versions.
- “Delete offline copies”: All offline copies of files and subfolders in the selected folder will be deleted locally.
The following actions can be performed by tapping and holding on Android devices and by swiping left and clicking “more” on iOS devices:
- “Update offline copy”: If a file is available offline and a new version of the file is uploaded to the PROOM server, the new version will be downloaded.
- “Update offline copies” (folder): All files in a folder that are available offline will be updated.
Switching between online and offline mode
- You can switch by opening the login page and clicking “Offline”.
- You need to mark at least one project room, folder, or file as “offline” and enable “Store credentials” in the settings in order for the “Offline” button to be displayed.
Switching between offline and online mode
- You can switch by opening the login page and clicking “Login”.
You can also use the navigation under “Upload” and click “Offline” to switch.
If the user cancels the operation or if an error occurs, the operation will be stopped. All files that were successfully downloaded by then will be available offline.